Showing posts with label DIY. Show all posts

Sunday, July 3, 2011

Boy Room Redo

With our oldest's birthday approaching I wanted to do something fun and there are only so many possessions that seem exciting.....so we went for the surprise factor.

My sister and brother-in-law wanted to take the boys to an amusement park one Friday...and that gave me an idea....an extreme make-over!  Well extreme in the time frame....not million dollar by any means!

Now decorating may not seem like a big thing to do for a boy.....but you have to know that we've been here 6 months and it was really bugging my oldest that his room wasn't put together.
In our last house the boys had a surf themed room and I just didn't want to put a bunch of holes in the wall to put up their old decor.  So we had been trying to work out a plan they both agreed on.
And recently, we found this duvet cover at CB2.  Ian loved it...he said it reminded him of a favorite game, Pictureka.  I went to the CB2 store in Berkeley and checked it out in person to make sure there weren't any inappropriate pictures in there.....and it checked out.
 So even though Merrick hasn't found his duvet/comforter yet....he had a hand in the color scheme.
So take a look at the before pics.
I didn't think to grab the camera until I had stripped the beds....so it looks especially sad.
Another factor in the color scheme was this chair.
We love it...It's kinda like Ian's reading corner.
So I looked into chair covers and thought about reupholstering it...but that was NOT going to happen on my one day redo budget. So I just went with it.


Here you can see why my son was so distressed.  He would say things like..."Mom, I feel like our room is missing something."  or "Can I just have a Giant's poster mom?"
So after 6 months of plain....here is what I came up with.
I figured grey was the best compliment for the black and white....and then I added a blue highlight wall.
I originally wanted to paint a black skyline on this wall...with a grey shadow.
But when Thursday finally rolled around I had been to a Math class with Ian, taken the kids to Berkeley to build in a salvage yard, delivered Talia to and from Cheer Camp, cooked dinner....then finally dropped them off at Marmar's for a sleepover by 7pm.  When it was all said and done, I didn't get the room prepped and taped off until 10pm.  Two coats later.....I was in NO mood to fill in those buildings.  
Instead, I painted a grey SF skyline with a glow in the dark highlight....It is now Ian's favorite part of this room.  Mission accomplished :)
The orange and grey highlights were requested originally by Merrick.   That boy wanted color and I was happy to oblige.  I also figured that the orange would allow for a bit of their team spirit to show through.
Don't tell them...but I would SO rather not have a completely sports themed room....so I gently steered them otherwise.  Thankfully they are amazed by it all and there is plenty of room for another Giants poster or two ;)  

Here are a couple of personal touches I threw in.... 
We already had these hat hangers...so I kept them to go behind the door.  
Yeah, they're dog butts.  Gotta represent when you're a Weinerdog. ;) 
That bike wheel is another touch I didn't quite finish.
I ripped it off a bike that just lost it's chain, and I sprayed it up to add another orange highlight.
It will be mounted over their closet...either plain or I might turn it into a clock. 
 It's just a quirky thing either way.  
Back to the beds....
I'm realizing that I don't have a good picture of  Ian's bunk. 
It's basically the duvet with orange and grey pillowcases.
Merrick sleeps on the bottom and it already had a black cover so I just added some color for now.  Green to match the chair...and the pillowcases that match Ian's duvet.
The pillows in this room were another miracle of sorts.
Pillows are such an affordable and useful way to add color so I bought the two pillowcases that matched the duvet, a pair of orange, and a pair of grey at Walmart.  And I found those other black and white slipcases as well as the green one at CB2.  Altogether I had 9, count them NINE pillows to fill...and somehow between my house and my mom's we had exactly enough!  I didn't buy a single extra pillow. Hallelujah!
I also had these two posters from Christmas that we had never opened.  So I painted some frames I had on hand.  Merrick's says, "Jesus...the Calm in the Chaos." So I put it above his bed.
Those posters were an adventure in and of themselves....Two of them were plexi and the other glass....and I managed to damage each of them in the decorating process.  
My solution?  I just spray mounted them to the cardboard backing and framed 'em up.  Done.
My favorite one ended up So crooked....but I'm just going to pretend I MEANT to do that!
It is perfect for the doodled feel of the room.  
It has a shaker and a bulb on it....and it says "Be These."
Love it!
Considering that I got this idea on Monday and executed it on Friday...I'm totally happy with the results.
I did have so much help...Friends hosting playdates while I picked out paint, Papi mounting curtains, my hubby making last minute runs to the store for painter's tape, and even a friend's projector to help me get my skyline sketch up on the wall.
Friday I 'woke up' after getting about 4 hours sleep, swapped the boys with my sister, and finished decorating the room with Marmar in between baby Josiah's naps.  Then we attended Natalia's cheer performance, grabbed dinner and headed to the Drive-in.  Would you believe that I fell asleep during Cars 2? Darn it!
But it was worth every second when we brought home the boys and told Ian one of his first birthday gifts was 'on' his bed.
I can't believe we  pulled it off RIGHT in front of him!
Even Natalia managed to keep his duvet a secret...amazing :D
He'll have a couple of small things to open on Monday, but he was amazingly content with his bedspread, and his poster. 
Sigh....that was fun!
Happy Birthday to our Favorite Ian....and bonus surprise for Merrick (who is eager to add more glow in the dark paint to that mural.  Heaven help the control freak in me!)
Love those boys...

Wednesday, March 30, 2011

DIY: For Better or Worse Valances

In the midst of finishing Natalia's valance I was also working on decorating our front windows.
Remember that box from my sister? 
 She had picked up this lush fabric on clearance at Joann's and never found an occasion to use it.  
Once again, a beautiful freebie to work with!
I loved the contrast of the black, flocked flowers on a creamy background.  

I decided my sad bare windows could this bold pattern.
They were suspiciously tall and blank, like WIDE-eyed exclamation points.  
THOUGH, I can't show you just how bare because I didn't think ahead
 to take a Before picture.

Just take my word for it.

Back to the fabric.
We (my sister and I) decided I'd have JUST enough
 to cover the four windows in that room.  So I stalled for a few days until she could come over and hold my hand.  MAN, I was so scared to cut this beloved fabric!
But once we got going I got tunnel vision.  And that's what I'm blaming for my novice mistake. 
It wasn't until I cut the LAST piece of fabric that I realized the pattern should be running vertically.
Oops, I had mistaken those large tulips for Leaves.  
But when your Interior Designer sister tells you no one will notice,
you just believe her.

So stop noticing ;)

As for my methods....I stuck to what I was familiar with.  Only, this time I didn't even bother with the staple gun, I just I bust out my trusty glue gun.
 I wrapped the fabric around the 2x4 and then tried to tuck and glue the sides. 
However, there was an unfortunate pucker toward the middle. 
(sorry no picture of that either)
Then my sister suggested I make the valance in three parts.  Genius!
So I cut and glue-'hemmed' the front large piece of each valance
 and created two smaller pieces for the sides.  Here's a side view of the fabric covered wood.
Next, the backside.  
You can see how each piece has 'seams'....all glued not sewn.
Oh yeah baby ;)
If I can do it, you can do it.
We measured the length and marked it with a pencil, then I just folded the fabric along that line as I ran a bead of glue in between.  
The key was to measure and remeasure to make sure the hem stayed straight.
Aaaaand, even then you MAY goof.  I know I did.
But the cool part about these valances is how high up they would be.  
I'll also recommend you keep a matching Sharpie handy.  
I used a black one to camouflage any visible glue.  
Sssshhh, that's our little secret.
I highly doubt my work will be inspected.

Other than that, if I messed up I just pulled apart the two pieces of fabric and re-glued them.
All those glued seams perfected the stiff box shape I was looking for.  
The end result holds up well.
By the way, I'm sure it's obvious that I cut corners anywhere I can.  
Thus the one valance over the two windows. 
I was afraid that if I split them up,
the chance of them being uneven or mismatched
 would increase beyond my desire to even WANT to create.
And that's HUGE!
Thus, the unibrow.
I know, I know....the cords on my topiaries are ridonculously obvious.  
Just lift your eyes up kids....don't look down.
I'll work on those later.
Until then...enjoy the view.
PS- this little bookshelf is a favorite of mine. 
Our amazing Papi fashioned that bookshelf from a Pottery Barn ad I showed him.
The design is similar to this Martha Stewart one, only he backed ours with white bead board.
It's so simple and special, and perfect for our 'schoolroom.'
And that is all I have to share for today.

Stay tuned folks, there are plenty of spaces left to decorate around here!
And our next project involves this colorful fabric:
YAY!

Monday, March 21, 2011

Puppy Party

Are you a dog lover?  
I am converting.
But it's been a slow process. 
Our girl, though....she was born one.
It's no surprise that she asked for a Puppy Party for her 5th birthday.
And you may know by now, we just need a theme, and we'll run with it.
So she invited 5 of her favorite people and we played Pass the Paw.
Each time the puppy song stopped, the winner earned a Monopoly dollar. 
The girls were so excited about winning a dollar even though they had NO idea what they'd be buying!
And I have to give a special shout out to my boys....they were such great helpers.
I'm sure they'd tell you they are getting too old for this stuff.  But they were right in there with the girls the entire way!
Next they moved to the Adoption center...where they were entertained and informed by Ranger Dad.
He shared with them a ton of cute puppy dog facts and then quizzed them about taking 'care' of their new puppies.  Finally they girls were able to get their hands on their new furry little friend.
Thankfully everyone had a favorite and there weren't any conflicts between the new mommies.
Next the boys lead them on a scavenger hunt.
Growing up my mom would hide our presents and then we'd have to follow a series of clues to find them.
Well I thought I'd bring a little of that into the party. Also, I'll let you in on a little secret....I set every clue  on the opposite floor of the house, so the kids expended some energy running up and down, up and down those stairs.  Sshhhh, that's only for us grownups to know ;)
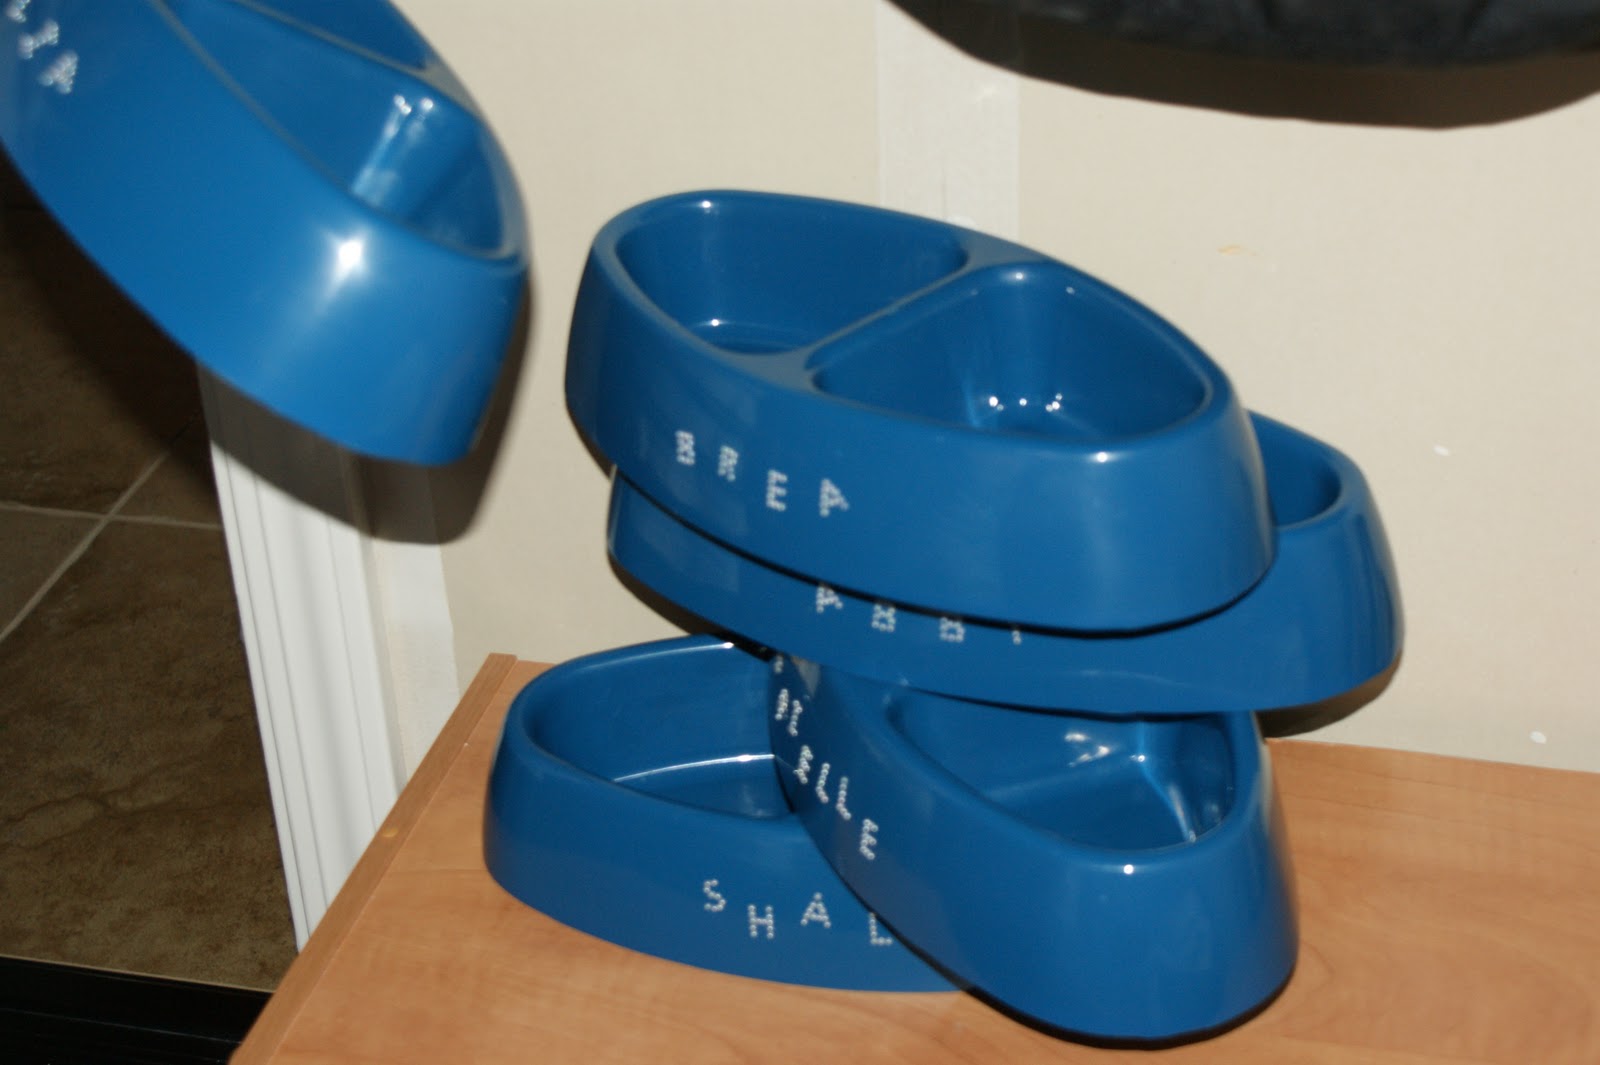
The hunt ended in the garage where the girls found their chow bowls:
(I feel the need to preface this gift by explaining that Natalia and some of her friends LOVE to 'play' puppies together.  They trade off on being the dog or the Princess who owns the dog.  And eating out of a dog bowl is like a dream come true....since it'd obviously be frowned upon in 'real' life ;)
So Natalia was thrilled that I bedazzled these Dollar Store chow bowls for the girls.
Ah, if only it could stay this easy in her teens!
Next we introduced the girls to our store.
Welcome to PetStart ;)
Here they could use their monopoly money to buy supplies for their puppies.
The Puppy Chow was a hit (who doesn't like Cocoa Puffs?)
There were also leashes, tags, collars, and crates for the girls to purchase.
My boys were more than happy to play store owner.
...SUCH good sports!
We spent some time placing jewels on the felt collars I had cut out....and the girls actually poured their Puppy Chow into their bowls for a snack.
Then Natalia brought out the Vet kit and examined the new adoptees.
Unfortunately, there must have been a bad case of kennel cough going around because ALL of them were given a sad diagnosis!  But nothing a little love wouldn't fix.
Next our family arrived for dinner. 
We served chocolate milk (Talia's favorite) and of course hot DOGS.
I gave myself a break on the cake making and bought ice cream cupcakes from Cold Stone.  
Greatest idea ever... I STRONGLY recommend them!
They have a chocolate cupcake shell, a small piece of cake, a scoop of ice cream and then colored whipped cream on top, YUM!
Whew...are you puppied out yet?
Feel free to take a break, but the rest of this post is dedicated to the gift opening :D
We try to have the gift giver sit next to the birthday person while their gift is being opened.
I love this arrangement because I get to shoot moments like THIS much easier:
I also adore Ms. Abby's face here...pure excitement for Natalia to see the clothes she gave her. Ahem, Barbie AND big girl clothes <3
Brielle gave Natalia a dress that matches a dress she has so they can be twins....
man, girls are something else! So sweet!!
The pictures of the other girls didn't turn out, but she LOVED each of her presents and responded accordingly!
Next,
a moment of silence while I revel in my family.  Oh, my loves:
Ah....thank you.
Now, "On with the show," as Natalia might say!
Her one great wish was for a Barbie this year. 
My sister and I researched and agreed on God's Girlz as a great option.
She didn't mind,
You can see her reaction with her Uncle Ryry here:
All in all, it really was one of the easiest birthday parties we've done.
We started at 3pm and I took the last friend home just after 7:30pm.
And that was only because the girls were having so much fun.
Special thanks to Marmar who sponsored this event  ;)
Without her I'd probably just fashion puppies out of old socks or something, ha.
And who knows if that would ellicit this response:
Our sweet girl is finally 5.....
And I'm not sure how we'll top this one, but for now, it will be one of the most memorable birthday parties for us all!

Thursday, March 17, 2011

DIY: Sweet or Spooky Valance

As evidenced by my FB glue gun rant....I've been acrafting as of late.
And not just any craft....I've been decorating our bare window frames. 
 My greatest cheerleader is my sister with her Interior Designer ways.
When we first moved in she sent me home with two HUGE boxes of fabric 'scraps.'
Needless to say I've been trying to figure out how many pillows and valances I could make ever since!
The challenge is that I don't sew....or atleast don't WANT to sew....thus the glue gun.
The other weapon in my arsenal is my trusty staple gun.  
woo hoo!
And away we go......
Talia's room is taking on a Bohemian Chic theme.....filled with lots of patterns and tons of color.  
So we brought out this fabric and it works great in her room. 
First I stapled it around a 2x4 and my sweet hubby mounted it with L brackets to the wall.  
Then I stalled for 2 weeks while I collected opinions on its final length.
Yea, I'm indecisive like that.
In the meantime, Natalia grew accustomed to the flat flap of fabric over her window.
Finally my sister came over and gave me the idea to add the ribbon to make a dog-eared something or other....(ha, feel free to correct me in the comments Trish!)
I must digress here to breathe fear into this story.
That same day Trish came over, I picked up The Neverending Story for the kids to watch.  
It was one of my favorite movies growing up...and the kids were excited to watch it.
I was a little leery of that wolf-type creature, G'mork, scaring Natalia....but she is pretty good about letting me know if something is too intense for her.  She didn't even look nervous, and raved about the movie for the rest of the day.  That being said, she cried that night when it was time to go to bed.   
We had tucked her in peacefully, but the minute she was left alone she came running out hysterical.
Enter, the evil valance.
I admit, it was overly poofy, and unhemmed, but SCARY?  
Crooked maybe.  The pink ribbon didn't match well.
But it shouldn't have been frightening to a child!
Martha Stewart maybe, but a 4 year old?
However, 
she swore she saw the Rockbiter in her valance.
I shut off the lights and tried to see it her way.
I had to admit her nightlight cast an unfortunate set of shadows....
But I must say,.... if you haven't seen the movie..
The Rockbiter is a GOOD guy.
He's actually really endearing....and as sweet as a pile of rocks can be.
**sigh...
here I was worried about the length of the valance and instead I should have worried more about what my children were WATCHING while I was creating the valances!
Bad mommy of the year award goes to the creator of THIS: 
So tonight I cut off half the fabric, glued myself a little hem and changed the ribbon on the valance.
The lighting is a little off since I did all of this WHILE she was asleep tonight....
Hopefully the scary billows are now gone.
Looking at the pictures I need to straighten the ribbon, but overall, I'm done here. 
Her other window should come together quickly now that I know what I'm doing.
And to keep my sanity I'll have to ban The Neverending Story for another year or two.
Sorry buddy.  
I'm going to sneak back in here to ask for your opinion....
Painting in here is a low priority since we haven't even touched the boy's room yet.
But I love to get my wheels spinning.
What color do you think for the walls?  
Or a combination of two colors?

Thanks!